Embossing Basics

Paper Embossing- Creating Raised Designs
Basic Embossing For Paper Crafters
Embossing on paper adds so much dimension to all your paper crafts It gives dimension to titles, words, frames and images. For card makers and paper crafters it's a technique that adds so much to every piece;
All embossing share the same Idea. They give a raised look to paper. It now becomes either two or three dimensional. It's done by raising the paper or adding dimension to the paper with powders, pastes or other products.
There are different techniques for embossing. Each technique give a slightly different result. It can be as simple as using a stylus and a stencil. It can use embossing folders that create a pressure on the paper to complete a design.
You can use embossing for scrapbooks, cards and lots of paper products. You can color embossed pieces with ink, chalks, and even watercolors.
Using simple tools and your own imagination, you can take your projects futher than you ever believed possible
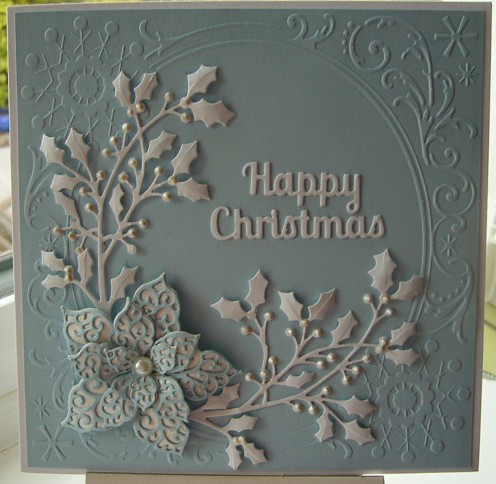
Embossed Card Colored With Chalks
Light Box Embossing
Using a light box is one of the easiest ways to emboss. The combination uses a stencil, some paper and an embossing tool. They often come in a kit. You can learn this technique very quickly,
Almost any stencil can be used for the light box embossing technique. In it's very basic sense, you are tracing on the paper, making a raised image. It's a great way to use your stencils that you all ready have in your craft space.
While the embossing machines are very popular, a light box is still handy to emboss on larger surfaces. For example, you might want to emboss a whole scrapbook page. The light box technique would be perfect for your larger projects, If you don't have a light box, you can use any transparent surface with a bright light behind it
Supplies
- A light box or another source of light
- Card stock
- A stencil of your choice
- Several embossing styluses00000000000
Directions
- Position the stencil on the light box. You can use some washi tape to secure the stencil.
- Place the card stock on top of the stencil and secure it with some washi tape.
- Use the stylus or embossing tool on top of the card stock. Place pressure on the paper with the tool and trace the design.
More Manual Embossing Techniques
- Paper Embossing: 6 Steps
This is a very easy technique that everybody can use at home with very simple tools, you can use it for your greeting cards!
DeBossing
Debossing is the exact opposite of embossing. While embossing has a raised design, debossing has an indented design. If you want to do it the easy way, just flip over your embossed design.
If you want to take your debossing technique to a new level, you can add ink to the mix. Learn how to add ink to your debossing here
Embossing Using A Manual Embosser
There are a few different types of manual embossers. The most popular being the Cuttlebug and the Scizzix.
Each of these machine are used with a hand crank. The pressure is applied to create the embossed design. They use embossing folders to create embossed image on the paper.
Each of the machines are sold with plates that are used in the actual embossing. The folders and /or dies are "sandwhiched" in between the plates with the paper. This creates a cut image or an embossed effect. The folders or dies are sold separately. However I consider them a good investment because they can be used multiple times. They are easy to transport to a class or crop.
More Manual Embossing Ideas
- Mel Stampz: Cut out pressure embossing tutorial
How to cut out elements from embossing folders - How to Dry Emboss without an Embossing Machine - Persia Lou
Learn how to emboss without a special embossing machine
Embossed Birthday Card

Heat Embossing -Using Embossing Powder
One of the most favorite embossing techniques is to use embossing powder. Heat embossing is a technique that adds dimension to almost anything. All you need is a stamp, some embossing ink, embossing powder and a drying tool. You can use any stamp that you have in your collection to make a special card or embellishment for your scrapbook page. Embossing powders are a good investment because just a little goes a long way.
Think creatively ! Heat emboss some die cuts and scrapbook titles to create dimension and interest
Markers and liquid embossing ink can be used on titles and brush lettering. You follow the same directions, except you use the markers or liquid instead of the ink pad.
Tip- Place your embossing powder in a zip lock plastic storage tub.Hold the piece over the container. Use a spoon to "spoon" the embossing powder onto your project. That way the powder will go right back into the tub.
Supplies
- Card stock-the heavier card stock will work better
- Embossing ink pad or markers or liquid embossing ink
- Embossing powder
- Heat tool
- Dyer sheet or anti static pad
- Small paint brush
Steps To Heat Embossing
- Place the card stock on a flat surface on top in the center of a piece of scrap paper.
- Swipe the surface of the card stock several times with the anti static bag or dyer sheet
- Press the rubber stamp on the embossing pad.until the stamp is covered completely with the embossing solution.
- Press the stamp on the card stock where you want to place it.When pressing the stamp against the paper, make sure that level pressure is applied firmly to the stamp’s back to ensure an even application.
- To ensure a crisp image, carefully lift the stamp straight up. Clean the stamp by wiping any leftover embossing solution off with a damp rag.
- Sprinkle the embossed image with the embossing powder. Make sure that all the embossing solution in entirely covered.
- Tap the imaged card stock to release any excess embossing powder. Use a soft paint brush to remove any excess powder outside of the image.
- Use the paintbrush to remove any excess embossing powder from your project before using the heat tool.
- Use the heat gun to heat the embossing powder. Follow the manufacturers direction. Keep the heat tool several inches away from the stamped image. Move the heat gun around so that the paper does not scorch. You will see the powder the powder turn into a shiny raised image.
- Allow the card stock to cool at least 30 seconds before handling it
Be careful with the amount of embossing solution, Too much of the solution on the stamp may make a blurry image.
Heat Embossing Tip
Run a dryer sheet over the surface of your cardstock before you stamp or apply powder. This will decrease the static and make for better results
Types Of Embossing Powders
Type Of Embossing Powder
| Properties
|
|---|---|
Opaque Color Powders
| Rich colors that completly cover inks
|
Opaque Metallic Powders
| Completly cover ink, but has a metallic shine
|
Opaque Detail Powders
| A finer grained powder that complely covers the ink. Best used for any stamp that has a lot of detail
|
Transparent Glitter Powders
| Clear powders that show the ink undenath but with a glitter look
|
Opaque Glitter Powders
| These powders will completely cover the ink on which they are applied, showing only the color of the embossing powder. The "tinsel" powders contain a greater amount of glitter.
|
Special Effects-Glow In The Dark
| A translucent powder applied over light colored ink. The color of the ink will show through, but the image will glow in the dark
|
Translucent Pearls
| A delicate powder that will show the inki color underneath, but will add a pearlized glow
|
Transparent Clear
| Powder that will show the ink color underneath but will add a raised shine.Clear and Clear Detail are finer ground powders, while Clear Enamel (Super Gloss) and Enamelware are a coarser grind which allows the powder to build up quicker for a heavy, thick application.
|
Embossing powders come in sets or as single colors. They come in fine, super fine and regular. White, clear and gold are the most popular colors
Foil Embossing
The newest craze I paper crafts is foil embossing.. Foil comes in a host of colors. It is easy to do and the foil will go a long way. Now their is a machine that has hit the craft market with a huge bang. It is called the MINC machine.. It will foil your cardstock with specific designs. It adds a very professional look and drama to all your projects,.
Easy Foil Techniques
Foil is such a pretty sophisticated and retro technique. It adds a special nostalgic or modern look depending on how you use it. Here are a few ideas to get your creative juices flowing
- Foil With Stamps. You can add a truly unique creation to any of your cards, scrapbook pages or paper crafts just by foiling using a stamp. All you need is some glue, a stamp and a piece of foil in the color of your choice. Use a q-tip or a ink dauber to daub an amount of white glue to your stamp. Make sure that you completely cover the stamp. It should be a white glue like flitter glue. More open and artsy stamps work better for this technique. Apply the stamp to your cardstock . Clean the stamp right away with a baby wipe or stamp cleaner. Lay the foil on top with the shinny side up. Use a bone folder to rub the reverse side of the image. Then rub the bone folder along the foil on the right side, only going in one direction. Gently remove the foil piece. The nice thing about this technique is that you can use the negative space on your foil as well
- Foil With Tape. Secure pieces of double sided tape in the arrangement of your choice. Since the tape comes in different widths, the arrangement is really up to your imagination. It could be in stripes a single line or a border. It could define elements of your project. remove the top of the tape and place the foil on top. Run your bone folder over the top of the foil. Remove the foil and you will be surprised at the results
- Foil With Stencils. Secure the stencil on a piece of cardstock with tape that is easily removed. In a ventilated space, spray the stencil with spray adhesive. Remove the stencil and place in water to clean. Place the foil over the paper and smooth with a bone folder
Simple Gold Embossing Technique-Manually Done
Embossing With Embossing Paste
This has to be one of my new favorite embossing techniques. Easy to do and yet the results you get are awesome........The great thing about this embossing technique is that the embossing paste lasts for quite a while.
The embossing paste is a creamy mixture that is like frosting. It creates a raised texture using a stencil. The material is spread with a pallet knife over the stencil, You can add ink to create a custom color. You can also use water colors on top to create a resist technique. While the main color is white, there are some that color with a metallic tint.
You spread the embossing paste over the stencil. Make sure that there is even coverage. Use a pallet knife or an old credit card to spread the paste over the stencil. Remove any access. The great thing about the embossing paste is that a little goes a long way
When using this product, clean your stencil right away so that the paste does not dry on the stencil. Work on a covered surface !
More Embossing Techniques
- Technique Tuesday – Wax Paper Resist and Wax Paper Emboss Resist | StampinU
Well, it is time for another Technique Tuesday! I have been playing around with this technique recently to share it with my stamp clubs, so here is a little info on how to do these neat techniques: Wax Paper Resist and Wax Paper Emboss Resist Wax Pap - Mel Stampz: À la Peanut Butter Ink-Resists!
Ink resist pressure embossing
Embossed Journal Piece

Storing Your Embossing Folders, Pastes And Powders
There are a few ways to think about organizing your embossing supplies. Here are a few of my favorites. Your choice for storage will largely depend on the amount of space you have and the supplies that you have in your stash.
Embossing Folder Storage- You can keep your folders in any box that will accommodate them. I have found that if they are in a decorative shoe box, I forget what I have and they go unused. Another idea is to keep them in a box that was meant for refrigerator storage. You can keep them all upright and they are visible but neat. For me, I keep them in a Scraprack page meant just for holding embossing folders. They are easily accessible and I have made one sample for each folder so I can see exactly what is available.
Embossing Paste- I have a limited supply of the paste at the moment, but I plan on adding more to my stock. I will be filling them in the drawer with the coordinating color for that paste/ I keep all my golds, silvers, white colors together. That way when I am putting a project together, I can easily find what I need in that color.
Embossing Powders- A little powder goes a long way, so I keep small bags in my color storage in my Scrap Rack
Embossing Folder Designs

Embossing Folders
Embossing folders are so easy to use and create unlimited uses for all kinds of projects. They are two sided plastic pieces that hold a piece of card stock. The plastic has the design embedded into the plastic
Some embossing folders create a simple two D background. Others create a 3 D effect. Some also cut a design in addition to creating a two or three D effect.
To use embossing folders, you will need either a manual or electronic embossing machine. The manual machines use a hand crank, while the electronic machines push the projects through on their own. These same machines are also used for die cutting.
The embossing folder and paper are placed between plastic plates. The pressure of the machine as these plates are pressed creates the raised effect and or cutting effect.
There are a lot of extra effects that you can use with your embossing folders to create unique projects of artwork
Cleaning Your Embossing Folders
Unless you are using an ink on your embossing folders, they should stay fairly clean. However, if you are using inks or other media, you should clean them as soon as possible. Baby wipes are an easy choice. I keep a package of them in my craft room. But you could also use stamp cleaner to get in all the grooves. Just make sure to leave the folder open until it's completely dry before you put it away.
Want More Craft Ideas & Inspiration?
- Paper Craft Workshop (linfcor) on Pinterest
Paper Craft Workshop | How would you like to create something special, be inspired to reach some new goals, or create a new joyous chapter in your life? I'd love to show you how
© 2015 Linda F Correa


